
Showing posts with label christmas. Show all posts
Showing posts with label christmas. Show all posts
Friday, October 15, 2010


Thursday, December 31, 2009
a sneak from me
so, I'm getting my post ready, and then I see Flo made the same one! ha ha.
oh well.
so, prepare yourself for more january kit sneaks!

 a project using the kits will be going up soon (I forgot to pick up my pictures).
oh well.
so, prepare yourself for more january kit sneaks!

 a project using the kits will be going up soon (I forgot to pick up my pictures).
Wednesday, December 2, 2009
Need help Christmas shopping?
I just wanted to take the time to highlight some non-scrappy stuff at the shoppe.
If you made it to our open house, then you've seen it.
We made room in the front of the shoppe to highlight handmade goods from local artists! It's small now, but it will grow (I hope!)

(I've been trying to upload more pics for the last 15 minutes, but blogger's having none of it, you'll have to make due with the link at the top of the post)
Along with paper and memory-making kits you'll find...
If you made it to our open house, then you've seen it.
We made room in the front of the shoppe to highlight handmade goods from local artists! It's small now, but it will grow (I hope!)

(I've been trying to upload more pics for the last 15 minutes, but blogger's having none of it, you'll have to make due with the link at the top of the post)
Along with paper and memory-making kits you'll find...
- embroidery patterns
- coasters
- handbound books and journals
- knit phone cozies
- knit hats
- knit wrist cuffs (which work great as Tim's cup cozies)
- fabric wrist cuffs
- pencil case wraps
- crocheted flowers
- camera strap covers
- paper embellishments
Coming soon...
- mittens
- knit toys
- a new 2010 planner kit
- a new 2010 planner kit
- new snowflake embellishments
- aprons
... and more
Perfect for teacher gifts and stocking stuffers!
What would you like to see in our handmade section?
Friday, November 27, 2009
Advent Calendars
I missed my Wednesday post, so I'm popping in now with some Advent Calendars I've come across lately.
I've seen these Advent Calendar Cookie Trays before, but just thought I'd share this one from Making Memories with you all.

I've seen these Advent Calendar Cookie Trays before, but just thought I'd share this one from Making Memories with you all.
 I can totally see my kids looking forward to every new "ornament"!
You can find the instructions here.
I saw this door hanger one from Heidi Swapp. (Well, this one's not counting down to Christmas, but it'd super cute if it did!)

Course this one (converted to a holiday theme) that Flo shared is still my favorite!
Wednesday, November 11, 2009
December Art Journal and a giveaway
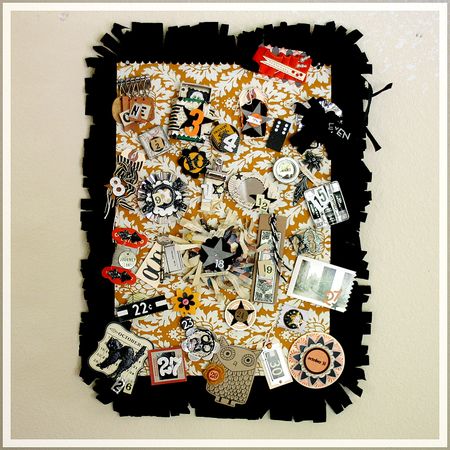
It took me part of an evening, but my December Art Journal is put together and ready to go.

I'll be sharing my art journal/mini book here as well as guiding you through a few tutorials. Hold on... it'll be a long post.
If you don't have any of these supplies, feel free to substitute with anything in your stash! Make it yours!
Note: When I'm assembling my book I make sure that I put envelopes or folders or anything that can hold a lot of stuff in places where I'll need it. For example, I make sure that I have an envelope for the 16th (my son's birthday) where I'll potentially have more things that I'll want to include. I also make sure I have a folder or large paper on the 25th and other days where I'll have gatherings.
I move my papers around a lot and put my numbers on at the very end. You could also keep your numbers off and just add them on the day... giving you even more time to move your pages around before commiting!
So, here's what I did to create the foundation pages for my book.
Supplies:
- December Art Journal kit
- cardstock
- sewing machine
- embroidery thread and needle
- circle hole punch
- scallop border punches
- star punch
- page protector
- zig zag scissors
- wax paper
*Don't throw our your packaging... we'll be using that too.
Cover and back.


How will you be recording the holidays? Are you making a December journal?
I'll draw a RAK from the comment section on this post at the beginning of next week.

I'll be sharing my art journal/mini book here as well as guiding you through a few tutorials. Hold on... it'll be a long post.
If you don't have any of these supplies, feel free to substitute with anything in your stash! Make it yours!
Note: When I'm assembling my book I make sure that I put envelopes or folders or anything that can hold a lot of stuff in places where I'll need it. For example, I make sure that I have an envelope for the 16th (my son's birthday) where I'll potentially have more things that I'll want to include. I also make sure I have a folder or large paper on the 25th and other days where I'll have gatherings.
I move my papers around a lot and put my numbers on at the very end. You could also keep your numbers off and just add them on the day... giving you even more time to move your pages around before commiting!
So, here's what I did to create the foundation pages for my book.
Supplies:
- December Art Journal kit
- cardstock
- sewing machine
- embroidery thread and needle
- circle hole punch
- scallop border punches
- star punch
- page protector
- zig zag scissors
- wax paper
*Don't throw our your packaging... we'll be using that too.
Cover and back.

Take your 5x7 chipboard piece and punch two holes in it for your binder rings. Use this as a template for the other holes you will punch as you construct this book. Using the back cover as a template punch the holes in your bingo card for your cover. Trim a piece of ribbon and sew down the side.
Pocket page for extra supplies (I had supplies from the kit that I'll only use as I fill up my pages and wanted to store them together).

Take extra cardstock and trim it to 5x7. Using a scallop punch (or freehand it with scissors) punch one 5" end. Take a coordinating piece and trim it to 4.5x5". Punch a half circle on one of the 4.5" sides. Sew onto the larger cardstock as shown. Store extra stickers, die-cuts, etc.
Page 1.

(note: for most of the pages that made use of the 6x6" patterned paper sheets in the kit I trimmed them down to 5" wide). Trim your music note paper down to 5x6".
Page 2.

Take a piece of copy paper. Fold it in half. Draw a bracket shape like this { on the paper. Cut it out and unfold. Use extra cardstock from your stash. Place your newly cut bracket shape on your cardstock. Trace and cut out.
Page 3.

Take an extra page protector. Trim to 5x7" and sew down the side, creating a small page protector. Trim a 1" piece off one of your 6x6" patterned papers and place in the side of the page protector. Sew an additional line down the other side of the patterned paper, essentually making a tall and skinny pocket for it. For now I just slide my "3" into the page protector.
Page 4.

Another piece of patterned paper trimmed to 5x6". Staple a small piece of ribbon to the top.
Page 5.

Trimmed your vintage book page to 5x7".
Page 6.

Trim the glitter dot patterned paper to 5x6". Use a scallop punch down the side.
When I use my scallop punch I punch first and THEN trim my paper down to size (5"). Doing it the other way around will result in a page that's slightly less than your desired size.
Page 7.

The misted paper.
Page 8.

Take two pieces of cardstock from your stash. One measuring 5x6", the other measuring 4x5" (with a scalloped edge). Sew a pocket like you did earlier.
Page 9.

Take a sheet of white cardstock from your kit. Take the 1" piece of music note paper that your trimmed off earlier and adhere it to the side. Take a piece of ribbon and stitch it on the seam.
Page 10.

Ledger patterned paper with a small ribbon stitched to the top side.
Page 11.

Staple the chipboard star to the edge of the 4x6" transparency.
Page 12.

Stitch another piece of ribbon to the side of the kraft cardstock.
Page 13.

Grid paper.
Page 14.

Use your scallop punch on the side of a piece of patterned paper. Thread yarn through the holes in the punched edge.
Page 15.

Hand cut a scallop down the side of a sheet of the white cardstock. Take embroidery thread and stitch random lines going down.
Page 16.

Adhere your artisan die-cut to the envelope so that it's partly covered by the flap when closed.
Page 17.

Tag
Page 18.

Using a zig zag scissor trim the side of a 5x7" piece of cardstock. Punch or hand-cut three stars out of cardstock. Sew down the side.
Page 19.

Take your large chipboard frame from the kit. Take your plastic packaging from the frame and cut it down the side. Stick your chipboard frame to the plastic. Trim around to create a "window page". Adhere your number directly to the plastic.
You may have noticed that I leave the back side of all my pages. It does not bother me to have them blank and unfinished. I figure that I can always cover them with photos... or just leave them. If you're concerned about having things look unfinished you can back them with additional paper or embellishments.
Page 20.

Scallop the edge of the large dot patterned paper.
Page 21.


Create your own glassine envelope with wax paper. Take a piece of wax paper and trim it to about 11.5x5" (you can do this right in your paper trimmer). Fold it so that you have an envelope that's 51/4" tall. Sew the edges. Fold over your flap and angle the corners with a scissor. For now I just threw an extra punched star in it.
Page 22.

Loose leaf page.
Page 23.

Red envelope
Page 24.

Trim one of your white cardstock pages with a scallop punch. Stitch a random line down the side.
Page 25.

File folder page.
Page 26.

Take a 1x6" piece of patterned paper and adhere to the side of a piece of white cardstock (5x6"). Stitch a piece of ribbon down the seam.
Page 27.

Snowflake transparency page (trimmed to 5x6")
Page 28.

Take your fabric and trim to 6x5". Stitch to an extra piece of cardstock (for strength) and zig zag the edge.
Page 29.

Take the grid chipboard back from your frame packaging. Trim to 5x7". Machine stitch onto cardstock (to hide the barcode, etc. on the back).
Page 30.

Using your zig zag scissors trim the edge of the candy cane striped patterned paper.
Page 31.

Hand-cut a scallop on the top of the circle dot patterned paper.
Gather up all your pages and add your binder rings.
Voila. Your foundation pages are done!
I'm determined to get my printer going and update daily progress on my blog in December but we'll see. If not, then I plan to print out any pictures I want to use on a weekly basis. I'm not at ALL set on taking a picture a day. Some pages may just be words or ephemera.
So.
Now... the giveaway.
How will you be recording the holidays? Are you making a December journal?
I'll draw a RAK from the comment section on this post at the beginning of next week.
Friday, October 23, 2009
open house - oct. 31
First of all... bad indoor lighting.

I'm narrowing down the details, but this year we're going to have to go with Saturday, October 31st for our holiday open house. Yes. I know it's Halloween. 10am - 2pm... so you can still hit the shoppe and get all your Halloween-y stuff in. This is what we have planned so far...
- special sales (also available online at http://www.myscrapshoppe.com/). More details coming soon.
- enter a draw to attend our "12 days of Christmas" holiday class (details on this online class will go up on Monday, hopefully).
- the November kit released a day early... and a project kit or two (for sure one).
- a section of the shoppe devoted to homemade goods. Great for gift giving. This section will remain indefinately (we've got a lot more planned for Red Star Studio). We'll be revealing bits and pieces of this on the blog as we go. There was already a little peek here.
- possibly some cupcakes. ;) and some decorations.
- blog posts featuring holiday ideas the following week, topped off by an online crop (Nov. 6 and 7th). I'm hoping to share pictures of the open house on the blog as well.
So. Clearly I have a LOT of work to do and I'm just hoping I can get everything ready in time.
What would you like to see at our open house?

I'm narrowing down the details, but this year we're going to have to go with Saturday, October 31st for our holiday open house. Yes. I know it's Halloween. 10am - 2pm... so you can still hit the shoppe and get all your Halloween-y stuff in. This is what we have planned so far...
- special sales (also available online at http://www.myscrapshoppe.com/). More details coming soon.
- enter a draw to attend our "12 days of Christmas" holiday class (details on this online class will go up on Monday, hopefully).
- the November kit released a day early... and a project kit or two (for sure one).
- a section of the shoppe devoted to homemade goods. Great for gift giving. This section will remain indefinately (we've got a lot more planned for Red Star Studio). We'll be revealing bits and pieces of this on the blog as we go. There was already a little peek here.
- possibly some cupcakes. ;) and some decorations.
- blog posts featuring holiday ideas the following week, topped off by an online crop (Nov. 6 and 7th). I'm hoping to share pictures of the open house on the blog as well.
So. Clearly I have a LOT of work to do and I'm just hoping I can get everything ready in time.
What would you like to see at our open house?
Wednesday, December 31, 2008
Thank you cards, part III
Here's the third (& last sketch) that I made for Christmas thank you cards:

And here's the card I made:

I used My Mind's Eye (polka dot), October Afternoon (stripes) & Basic Grey (blue) patterned paper, a Making Memories stamp and a Heidi Swapp chipboard heart, all from the Shoppe.
And as added incentive to make some cards, I've decided to offer a RAK. So, if you make a card using any one of the sketches I've posted this week, please link a picture of the card you made back here in the comments before midnight, January 4th and I'll draw from the entries for a scrappy prize. :)
Happy cardmaking!

And here's the card I made:

I used My Mind's Eye (polka dot), October Afternoon (stripes) & Basic Grey (blue) patterned paper, a Making Memories stamp and a Heidi Swapp chipboard heart, all from the Shoppe.
And as added incentive to make some cards, I've decided to offer a RAK. So, if you make a card using any one of the sketches I've posted this week, please link a picture of the card you made back here in the comments before midnight, January 4th and I'll draw from the entries for a scrappy prize. :)
Happy cardmaking!
Tuesday, December 30, 2008
Winner and my January 1st tradition
The winner of the Holiday Goodies is....
My favourite tradition is going to this little tree farm every year, to pick out and cut down our own Christmas tree, followed by a sleigh ride, hot chocolate, peanuts and cookies.(ps..GREAT sneak peek)
Trace G
Thanks for all your comments! It was fun to read them all!!
Trace... I'll hold on to your stuff at the shoppe for you!
Also, this Thursday (Jan. 1) I'll be counting inventory at the shoppe. If anyone's interested in joining me let me know!
My favourite tradition is going to this little tree farm every year, to pick out and cut down our own Christmas tree, followed by a sleigh ride, hot chocolate, peanuts and cookies.(ps..GREAT sneak peek)
Trace G
Thanks for all your comments! It was fun to read them all!!
Trace... I'll hold on to your stuff at the shoppe for you!
Also, this Thursday (Jan. 1) I'll be counting inventory at the shoppe. If anyone's interested in joining me let me know!
Thank you cards, part II
Here's another card sketch that I'd like to share with you today:

And the thank you card for Christmas cards that I made with it:

I used My Mind's Eye, Cosmo Cricket and Creative Imaginations patterned paper, a Maya Road chipboard snowflake and a Making Memories stamp, all from the Shoppe.
If you use this sketch to create a card, please link it back here in the comments-- we'd love to see it!

And the thank you card for Christmas cards that I made with it:

I used My Mind's Eye, Cosmo Cricket and Creative Imaginations patterned paper, a Maya Road chipboard snowflake and a Making Memories stamp, all from the Shoppe.
If you use this sketch to create a card, please link it back here in the comments-- we'd love to see it!
Monday, December 29, 2008
Thank you cards, part I
I've been so inspired by Liz's sketches that I thought I'd try my hand at creating some card sketches. And because I'd like to encourage my kids to make some thank you cards for some of the gifts they received for Christmas, I'd better set a good example by sending them, too.
And, I figured, since they're thank you cards for Christmas gifts, why not use some of my new Christmas scrappy supplies to make them?
So here's the first sketch:

And the card I made with it:

I used My Mind's Eye patterned paper (red), Pink Paislee patterned paper (cream and silver), a Making Memories stamp, a Maya Road chipboard snowflake and Making Memories acrylic paint, all from the Shoppe.
If you make a card using this sketch, please link it back here in the comments-- we'd love to see it!
And, I figured, since they're thank you cards for Christmas gifts, why not use some of my new Christmas scrappy supplies to make them?
So here's the first sketch:

And the card I made with it:

I used My Mind's Eye patterned paper (red), Pink Paislee patterned paper (cream and silver), a Making Memories stamp, a Maya Road chipboard snowflake and Making Memories acrylic paint, all from the Shoppe.
If you make a card using this sketch, please link it back here in the comments-- we'd love to see it!
Friday, December 19, 2008
Friday Sketch #7
If you're like me, you might have one or two (or a few) Christmas cards left to make... so here's a sketch for a little inspiration! I think it would work nicely for a layout too, if that's what you're up to this weekend... ;)

and here's my card:

I'm posting a thread on the message board, so you can link up a card or layout created with the sketch there! Have a great weekend!
Subscribe to:
Posts (Atom)