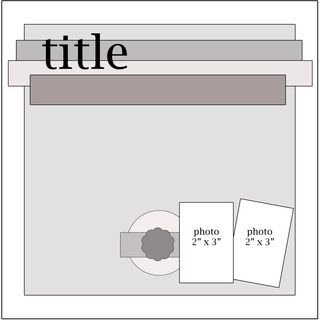
To start off my Winter Sketch series, I chose a Page Maps Sketch from September 2010:
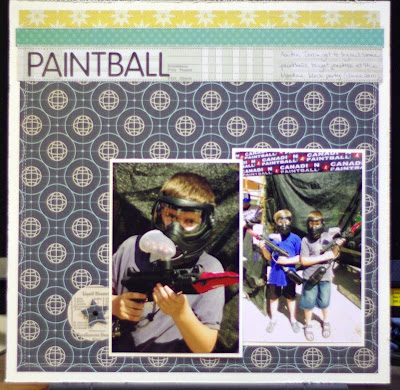
And here's the layout I made with it:
I stuck pretty close to the main elements of the page (the title & journaling placement and the border along the top third). I did, however, include different sizes of photos and omitted the extra squares of patterned paper on the sketch.
Now, it's your turn...
If you'd like to play along with my Winter Sketches, just create a layout using one of the sketches I post. Post your layout in the MSS gallery and then link it to this thread in the forum. Your name will be entered into a draw to win a RAK from me.
Can't wait to see what you create!
Friday, December 31, 2010
Monday, December 27, 2010
For new items in the shoppe
... just in case some of you have Christmas money burning holes in your pockets! :)
The new October Afternoon has arrived. It's online right now and will be in the shoppe later this week.
Modern Homemaker
Schoolhouse
Campfire
Friday, December 24, 2010
A new addition...
... to my scrap space.
For several years, I've sold my cards at Winkler Bible Book Shoppe and at Morden's Heartland. When I started doing this, my husband helped me make some card stands to display my cards.
Well, this month, I decided to stop selling cards, because with working, I just really didn't have very much time to make them for sale anymore.
But what to do with my display stands?
Why, add them to my scrap space, of course!
I painted them beige to match my space. I placed them under my shelf on my table, against the wall. Then, I filled them with stamps and punches.
My hope is that by having these things in front of me, I'll remember to use them on my projects.
Thanks for looking!
Wednesday, December 22, 2010
New Arrivals.
Checking into the online shoppe on a daily basis is paying off this holiday season! There's been new stuff showing up every second it seems.
First it was the KI calendars and scribble stickers.
Then, last Wednesday, it was new Doodlebug.
On Sunday it was the new Echo Park line Little Boy.
The next day, Monday, it was the new Cosmo Cricket line Circa 1934.
And today it's new We R Memory Keepers Sew Easy line, Tim Holtz' Tiny Attacher and Basic Grey's new Curio and Marjolaine.
Whew.
I'm trying to do a line or two a day, instead of trying to cram them all in in one day.
Up next...
New October Afternoon, SEI, My Mind's Eye, more new We R Memory Keepers and more.
Friday, December 17, 2010
Fall Sketch #13
My last Fall Sketch comes to you from Studio Calico -- it was their Sunday Sketch a couple of weeks ago.
And here's the layout I made with it, using mostly Crate Paper, some Bazzill cardstock, some American Crafts thickers and my new snowflake punch. The journaling is tucked behind the photo.
So, a reminder that if you create a layout using one of the sketches, post it in the MSS gallery and link it to this thread in the forum for a chance to win a prize! Since this is the last fall sketch, I'll give you until the beginning of the new year to complete a layout and post it in order to win. So, that's midnight on January 1, 2011 and I'll draw the winner's name on January 2nd.
Thanks for playing along!
Wednesday, December 15, 2010
Monday, December 13, 2010
hello! hello!
i thought i'd pass along this
tip. with the holidays around the
corner, this is the perfect time
to collect ephemera to use on your
layouts.
this would include:
-gift tags
-gift cards (after they're used)
-bits of wrapping paper
-ribbon.
-tags off of clothes or items
-even reciepts.
while this above layout isn't a
christmas one, it does use some of
the ephemera i was talking about.
i used tags and the gift card.
what other items will you use this
xmas in your scrapbooks?
later, jen
Friday, December 10, 2010
Fall Sketch #12
For this week's sketch, I made my own:
And here is the layout I made with it:
I had challenged myself to use up some scraps that I'd put together as I was sorting through my scrap file: My Mind's Eye, SEI & Bo Bunny. I cut the flowers using my friend's Cuttlebug and dies. The brads I used are Bo Bunny and Crate. The chipboard word is Crate as well. I used a We R Memory Keepers stamp for "beautiful" and some letter stickers (I forget which ones) for the title.
Remember, if you create a layout using one of the sketches, post it in the MSS gallery and link it to this thread in the forum for a chance to win a prize!
Tuesday, December 7, 2010
Friday, December 3, 2010
Fall Sketch #11
This week, I chose Sketch 205 from Pencil Lines:
And here's the layout I made with it, using the MSS December kit:
I stuck to the design pretty closely, substituting larger photos and adding my journaling at the top.
Remember, if you create a layout using one of the sketches, post it in the MSS gallery and link it to this thread in the forum for a chance to win a prize!
Thursday, December 2, 2010
december kit.
the december kit should now be in store! it's filled with studio calico elementary and sassafras count me in.
it also has one sheet of girls paperie tinsel & twig. when i saw it, i knew i wanted to lift this layout from elizabeth kartchner. i lifted it pretty exactly, substituting a homemade flower using the elementary stickers in the kit. the funny thing about this layout is that i made it with no photo in mind. so it sat, photoless for a good few days. i loved it so much i actually wasn't sure which photo i wanted to put on it. then it hit me - i have never scrapped a wedding photo. nor do i really ever want to. but for some reason this layout was just calling for it. off i went, flipping through our never looked at anymore wedding photos, and i came across this one. which honestly, was never one of my favourites. not sure why? bonus was that it was already in black and white so i didn't need to do any editing!
look for the rest of the dt layouts here!
Monday, November 29, 2010
my layout this week
so i finally got my layout done
that i told you about last week.
not gonna lie, i did this one today.
been still battling this stupid cold.
its almost gone!!! finally.
this layout also happens to be my
gorgeous new niece Lyla!!!
i used some SEI i've been hoarding,
my american crafts cloud paper...love
this paper so much!!! and i also
used some KI felt and chipboard. the alpha is
from a past kit!
this week i'll be doing some layouts with
the cool kit for december. stay tuned and
watch for the dt reveal later this week.
later!!!
jen!
Friday, November 26, 2010
Fall Sketch #10
This week's sketch is Sketch 103 from Pencil Lines:
And here's the layout I created with it, adapting it to a 12x12:
I used Pink Paislee & We R Memory Keepers patterned paper, a Crate brad & a My Mind's Eye ticket, all from the Shoppe.
Remember, if you create a layout using one of the sketches, post it in the MSS gallery and link it to this thread in the forum for a chance to win a prize!
Can't wait to see what you create!
Wednesday, November 24, 2010
a quick project.
interrupting this week's christmas card series to show you a project i completed a few months ago. after seeing it on numerous blogs i decided to give it a try.
i followed this tutorial, with the exception that i used actual cork board instead of batting. i had an old corkboard kicking around that i had brought with me from my childhood bedroom when we first got married. i have no idea to this day why i kept the thing for so long, but it worked perfectly for this project. i cut the cork to fit the inner hoop snugly and didn't bother using anything to hold it in place. i also didn't glue the fabric to the cork, i just used a staple gun. i chose to do it this way just in case i wanted to swap out the fabric sometime down the road - i was scared if it was glued on, it wouldn't come off as easily.
to hang the boards, i bought sawtooth picture hangers and nailed them to the back of the hoops. the fabric i purchased online very cheaply from this etsy seller. i think if i was to do it again i might use heavier weight fabric, like upholstery fabric, only because what i used seemed too thin.
this was a fairly inexpensive home decor project that didn't take that long to make and works great at displaying layouts! have you made these? how did it turn out for you?
Monday, November 22, 2010
...hey....howzit goin?.....
i am still not feeling 100% yet,
but i thought i'd share
with you what i plan to do this week.
i want to put a doily on a layout, and put
together some coordinating paper i've been
hoarding for awhile.
i also hope to create a few layouts with the
december kit..it drives me crazy. every year
i think we're getting a xmas december kit, and
every year i forget that that happens in jan.
when will i learn??
what do you plan to create this week?
later, Jen
Friday, November 19, 2010
Fall Sketch #9
This week's Fall Sketch comes from the My Mind's Eye blog:
Their challenge was black and here's the layout I created for it:
I kept pretty close to the original sketch, but added a few more circles for balance.
Don't forget, if you create a layout using one of the sketches, post it in the MSS gallery and link it to this thread in the forum for a chance to win a prize!
Thursday, November 18, 2010
christmas gifts part 2
this next card was inspired by this fiskars cupcake punch:
i actually pulled up the image on my computer, zoomed in, and then traced it. in the end, however, i decided that i wanted to add a candle and it wasn't quite working with the top. so i decided to round it out instead. and this is what i came up with:
very simple and great for kids, i think. be back next week with more card inspiration!
Wednesday, November 17, 2010
Weekly Challenge 18
This week's challenge is for you to make your own paper clip embellishment.
All you need is a paper clip and a small embellishment you can glue on top.
Monday, November 15, 2010
sick, sick, sick.
i stick my tongue out to sore throats,
stuffy noses, and wicked headaches.
happy monday....
stuffy noses, and wicked headaches.
happy monday....
Friday, November 12, 2010
Fall Sketch #8
For today's sketch, I chose Sketch #125 at Creative Scrappers:
And here's the layout I made with it, using the November kit:
I did a mirror image of the sketch and added a third circle at the bottom. I like the number three.
I also did some misting and I wanted to share with you how I did the title for this layout.
First of all, I chose some larger letter stickers from my stash. I was able to mix two different colours of thickers to get the right letters I needed.
Then I misted over the title on my background patterned paper.
I carefully removed the thickers (some of the patterned paper background tore a little, but I chose not to be bothered by it. ;) )
And then I added the Basic Grey chipboard letters over top.
I was really pleased with how well this worked for my title ("Kiss me! Kiss me!")
Thanks for looking!
(And don't forget, if you create a layout using one of the sketches, post it in the MSS gallery and link it to this thread in the forum for a chance to win a prize!)
Wednesday, November 10, 2010
Weekly Challenge
This week's challenge...
use wallet-sized photos.
Supplies: patterned paper - Cosmo Cricket | alphabet stickers - October Afternoon | stickers - Doodlebug | brad - Doodlebug | fabric | flower - Sassafras | transparency - Hambly | chipboard - KI Memories (Love, Elsie) | lace cardstock - KI Memories | Jewels - Doodlebug
Link up if you're playing along....
and don't forget to join us tomorrow through Saturday for our monthly online crop!
christmas gifts part 1
my work always does homemade or locally made gifts for christmas. sounds nice, in theory, but you try working with 17 graphic designers and tell me there's no pressure to make your own gift!
last year, i made cards for my coworker as she was moving to hawaii, so i thought it would be fitting. this year, i've decided to make cards again, for my coworker and my sister in law. over the next few weeks, i'll show you what i've made and how to make them. i also plan on making a baby book for my coworker (similar to this book i've made before), as she's just coming off mat leave, and will show you how i make it as well.
this first card was super fun to make and i think works well as a card for a kid. my coworker and sister in law both have children, so i thought making a lot of kid appropriate cards was a must.
supplies used: coredinations + bazzill cardstock, pebbles pp, red baker's twine
i stole the idea for this card from this site, and followed the instructions pretty much exactly. i did cut the size down since i wanted to include matching envelopes and the ones i had on hand were too small for the original design. these cards are the standard 4.25 x 5.5, as will the rest of the ones i make. one card opens horizontally, the other opens vertically.
Friday, November 5, 2010
november kit.
hi all!
i had very good intentions of blogging on tuesday. i even remembered while at work. but once i got home and we got busy doing stuff, i completely forgot! so i'm posting today instead with some november kit layouts.
this has been one of my favourite kits to date, mainly because of the crate restoration paper. i had to go and buy doubles of some sheets because i used them so fast! here are some of my favourite layouts made by the DT this month:
Fall Sketch #7
This week's sketch comes from the Crate Paper Blog:
And, appropriately enough, for my layout, I used some Crate Paper goodness from the November kit:
I rotated the sketch on its side, left out some of the squares and used a larger photo.
Remember, if you complete a layout using one of the sketches, post it in the MSS gallery and link it to this thread in the forum for a chance to win a prize!
Thursday, November 4, 2010
Patterned paper storage
For years, I've been storing my patterned paper in some winter boots boxes that I cut down and covered with kraft paper. I liked that they fit well on my shelf and that I had it sorted by manufacturers, but I found lately that my paper was curling over and I didn't like accessing it from the side.
At my garage sale in September, my friend had brought a bunch of hanging file folders to sell and told me I could help myself. I took all of the legal sized ones that she had, thinking of a new patterned paper storage idea.
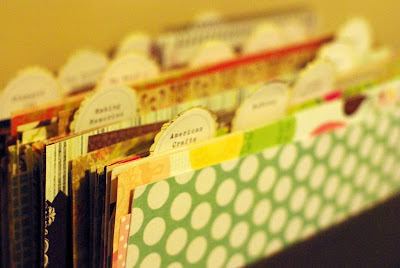
I went to Staples and bought a legal sized file folder container that came with eight more file folders. I bought it home and used it like this:
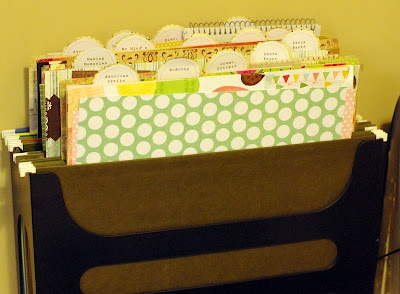
Once again, I sorted my patterned paper by manufacturers, in alphabetical order. This system works well for me, because I have a good memory for who makes which paper and I like my lines sorted together for ease of scrapping.
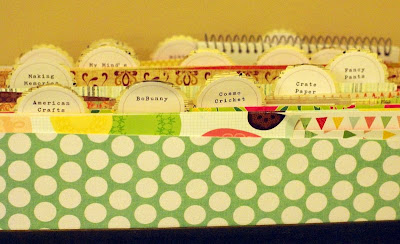
I printed up circles that fit my 1 3/4" circle punch on my computer, with the manufacturer's name in each one. I punched them out, then attached them to a scalloped circle that I punched out of old sheet music. These a stapled to a 3x12" piece of cardstock, from my scrap stash.
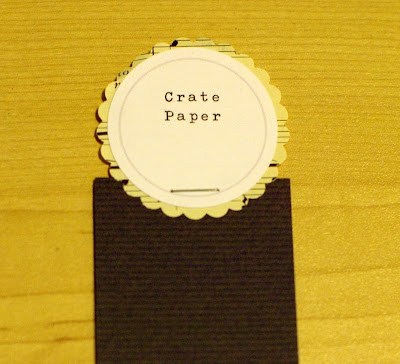
I placed these in the folders, behind the papers of that brand. I have them staggered so I can read them easily, but they can be moved if I need to accomodate a new brand.
How do you store your patterned paper?
Wednesday, November 3, 2010
Challenge 16.
A recipe challenge.
Let's see what you can cook up. ;)
Ingredients:
- 3 or more photos
- the color orange
- a photo corner
- a vertical title
- buttons
Subscribe to:
Posts (Atom)