Tuesday, March 31, 2009

No fooling...

... the April kit is awesome!!

Just check out a sample of what our designers created with it this month...

From Jen:


From Liz:


From Leigh:


And from our guest designer for the month of April, Flo:


To check out more fabulous creations, be sure to check out the April kit gallery. (Note: The kits should be online and in the store by the end of the week. )

Journaling tip #2

Today's tip is a tutorial on how to print on journaling cards or smaller pieces of paper, for journaling.

(I apologize in advance for the not-so-great photos... the lighting in my computer room is pretty poor.)

The first step is to choose a journaling card that you would like to print on and measure the height and width of it.


In Microsoft Word, I open a new document. Then I insert a text box, giving it the same dimensions as the journaling card.


For my journaling card, it wouldn't work to centre my journaling on it because of the "newsworthy" along the one side, so I added another text box roughly the size of the widest part of the bracket to my first text box.


Then, I open a new text box, and for fill, clicked no fill and for line, clicked no line. I fit it roughly into the first text box on the screen and I type my journaling in it.


(Now, often, I try to fill all the lines on the journaling card, but here, I didn't have enough to say. So I added extra words for this part, which I would delete later.)


Once my journaling is written, I count the number of lines on my journaling card (15) and make the font smaller or bigger until I have 15 lines of text in my text box.

Once this is done, I click on Format at the top, then Paragraph. Under line spacing, I click Exactly and then beside that, on At:, I choose a number (I usually begin with a number that's the same as my font size.) Then I click OK. I keep doing this again and again, increasing or decreasing the number, until the text fills the space of the text box.

Once I'm happy with it, I print it out on white paper.


Then I take my journaling card and line it up beside the text I've just printed out.


Here, it wasn't quite lined up with the lines as much as I wanted it to be, so I went back to Paragraph and increased my line spacing number by .3.


I then printed it out again and lined it up again. It still wasn't perfect, so I repeated the steps again, changing the spacing to 18.5. I printed it again, lined it up and was happy.

So, I adhere my journaling card over the text box. I usually hold it up to the light to see the text from the white paper through the journaling card to make sure it's in the right place.

I delete the text boxes with lines from my document (I don't want those being printed on my card) and I run the piece of white paper, with the journaling card attached, through my printer.


Now, I am ready to add it to my project, which in this case, was this card:


Supplies use: Bazzill cardstock, October Afternoon & Basic Grey patterned paper, a Doodlebug paper frill and an October Afternoon journaling card, all from the Shoppe.

If you have any questions or comments, please feel free to ask/leave them in the comment section and I'd be happy to answer them for you.

Monday, March 30, 2009

Journaling tip #1

I thought I'd share some journaling tips with you this week.

Before I discovered thw wonderful hobby of scrapbooking, I loved to look through my photo albums with a friend and talk about the photos in there.

When I started scrapbooking, I found that journaling came fairly easily to me, because I would simply write what I would say if someone was sitting with me, looking at the pictures with me.

So, if it was an event I was scrapping, I'd mention the who, what, where, when and maybe the why, if it wasn't obvious. Here's an example of a layout where I did this, using the March kit:


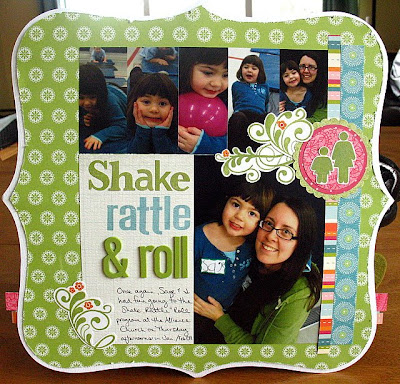
The journaling says: "Once again, Sage & I (who) had fun (why) going to the Shake, Rattle & Roll program (what) at the Alliance Church (where) on Thursday afternoons in Jan/Feb '09 (when)."

Even though it seems pretty basic and simple, later on, I'll appreciate having written down these details to remember this time with my daughter.

Other times, I'm scrapping more of an everyday moment. I've started writing down cute things that my kids say, knowing that I would like to record them on a layout one day.

Here's an example of a layout where I did this, again, using the March kit:


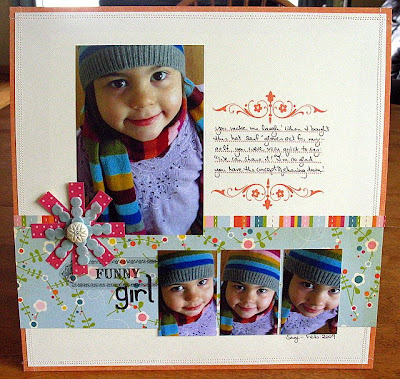
The journaling says: "You made me laugh! When I bought this hat, scarf & gloves set for myself, you were very quick to say: "We can share it!" I'm so glad you have the concept of sharing down!"

When I thought about my journaling, I originally thought that I'd include where I bought the hat, scarf & gloves (Superstore) but I realized that this wasn't really essential to what I wanted to remember (& I didn't have enough room!)

So, my journaling tip today is to journal what basically you want to remember about either the event you're scrapping or the everyday moment you don't want to forget.

Sunday, March 29, 2009

Pretty cards

Before I started scrapbooking, I remember looking at cardmaking supplies at a craft store and wondering who would make their own cards, when the supplies were so pricey. Surely it would be cheaper to just buy them!

Fast forward six years.... Now that I scrapbook and have many, many leftover scraps, I've realized how economical and fun it can be to make cards using leftover scrapbooking supplies.

Here's an example of a card I made using my leftovers from the March kit:


Supplies: My Mind's Eye pp, Bazzill cardstock, October Afternoon letter stickers and a Creative Imaginations rub-on, all from the Shoppe. The flourish stamp is a Making Memories one that I cut apart and is also from the Shoppe.

And here are some other beautiful cards that I've spotted in the MSS gallery recently...


These two by Flo:


And this one from Liz:


Have you been making cards with your scraps? Take a picture, post it in our gallery and link it back here... I'd love to see them!

Friday, March 27, 2009

Sketch #18

This is a card sketch, but it could easily be a layout--very simple, but sometimes those are my favourites...

And here's my card. I used the chalkboard technique (stamped the scripty image with white pigment ink, then used a sponge dauber and chalks to dab the image with colour).

I hope you're inspired to create this week... I'll add a post to the MSS forums so you can add your creations!

Friday, March 20, 2009

the Last Challenge...

... and here it is...

Use pop-dots on your layout.

I used pop-dots to raise the car on this layout.


Good luck everyone.

I can't wait to see what you all do. I'll be drawing a name the first week in April for the mystery prize!

Sketch #17

How about a two page 12x12 sketch? You are welcome to only use half of it for a one page layout...

and my layout:

Wednesday, March 18, 2009

Challenge #2

The next challenge...

Sew on your layout. (either machine stitching or hand-sewing... either are fine)

... and a close-up of the sewing...


The last challenge will be posted on Friday.

Remember... you only have to do one of the three to get in the draw!

Monday, March 16, 2009

Wanna win a mystery prize?

Okay. So, because I'm on holidays and unable to do a giveaway this month I thought I'd pre-post my blog entries with challenges and make you work for a mystery prize!

So.

Here are the rules.

I'll be posting three challenges. One today, one on Wednesday and one of Friday. Complete any one of them and link to your layout in the blog comment section of the challenge you completed.

When I get back I'll randomly draw a winner.

So... here's the first challenge...

Use a premade embellishment for your title.

Watch for the next challenge on Wednesday.

Sunday, March 15, 2009

Mid-Month Challenge!

The challenge for March is to complete a layout about YOU!

Here's Marcy's:
Leigh's:

and mine:

Create your layout and link it to the thread here to be in the draw for the monthly prize!

Friday, March 13, 2009

Sketch #16

Another Friday, another sketch!

Here's my card:


I'm adding a thread on the message board, so if you are inspired by the sketch, please post there!

Thursday, March 12, 2009

Patterned paper is on sale while I'm on holidays!

10 for $7
(excludes specialty paper)

Enjoy.

Monday, March 9, 2009

Lucky Me!

I seem to be the lucky one each month who gets to browse the very full gallery after the online crop! Here are some of my favourites from the March Crop:
Bronwyn:

Bryan:

Errlee:

Jen:

Leigh:

Marcy:

Susi:

Tammy:

Valerie:

Thanks so much to everyone who shared with us this weekend!

Saturday, March 7, 2009

Lots of fun challenges

can be found in the MSS online crop forum this weekend. Make sure you click on the link to check them out.

And lots of gorgeous layouts can be found in the MSS Gallery. Click on the link to be inspired.

Friday, March 6, 2009

Sketch #15

here's another challenge to work on before the "official" start of the online crop!

Create a layout or card based on this sketch...


Please post your layout in the thread in the Crop forum so we can see it!

Ooops!!

Do you ever have those "ooops" moments when creating a layout?

I do. Often.

What do you do when this happens? Are you tempted to start over? For a perfectionist like me, it's very tempting to start over. But I would go through a lot of supplies that way, and, although I like things perfect, I'm also very cheap. ;)

So, when an "ooops" moment occurs, I like to remember something I read in a CK magazine years ago, by Faye Morrow Bell (remember her?) She said: "Mistakes are just opportunities to be creative." It was totally an "Aha! moment" for me when I first read those words and they've stuck with me.

So, when I make a mistake on my layout, I like to think: "Hmmm, how can I get creative with this?"

Here's an example of an "ooops" moment from earlier this week.

I was sewing on my layout, as I love to do. I'd made one round on my machine around the border of my layout and was thinking of going a second time around. My dd asked if she could help. So, I let her press down on the pedal of my machine while I sewed. Normally, she's pretty good at stopping when I ask her to, but it was going too fast and the stitching ran off the side of the page. Since I didn't feel like redoing the whole page, I just thought, how can I make this work? I decided to run off the edge of each corner, so they were all the same.


And here's the finished layout, that I made with the March kit:


And since we've had a request for another early bird challenge, here's one for this layout:

#5: Tie one on

Create an embellishment on your page using ribbon.


Can't wait to see your creations!

Thursday, March 5, 2009

Early early-bird challenges

Because there's no school for those of us in the Winkler/Morden area, we decided it would be a great idea (thanks, Carol! ;) ) to post some early early bird challenges for those of you with scrappy plans for the day.

So here they are:

#1: Stamp it out!

Use rubber or acrylic stamps on your layout. They can be shapes, alphas, whatever you like. Bonus points if you use a stamping technique that you've never used before on a layout.

#2: Pile it on!

Create a layout that features layered embellishments. Let's see you pile them on!

Here's my layout for challenge #2, that I made using the March kit, as well as some My Mind's Eye patterned paper, Heidi Swapp felt flowers, a Fancy Pants felt heart, some Scenic Route letter stickers and some Basic Grey buttons, all from the Shoppe.


If you decide to participate in the challenge(s), post your layout in the MSS Gallery and then link it to the challenge in the March Onlind Crop Forum.

Happy Scrapping!

Wednesday, March 4, 2009

It's March...

which means the March kits are out!

Here's a sample of what our DT made with the MSS March kit this month:

Saturday, by Marcy:


Razzle Dazzle, by Liz:


Everyday, by Jen:


She's so very crafty, by Leigh:


To see more of the DT work with the March kit, check out the Red Star Monthly kit gallery.