Wednesday, March 31, 2010

weekly challenge 6

This week's challenge...

Use something you've been hoarding. I've been hoarding that yellow Love, Elsie paper for-ev-ah!


Supplies: paper - Love Elsie, Sassafras, Scenic Route, My Mind's Eye. tag - Collage Press, Making Memories. brad - American Crafts, Making Memories. clear circle embellishment - Making Memories. typewriter

If you're playing along leave a comment and a link in the comment section so we can check it out! Love all the inspiration out there!

Saturday, March 27, 2010

Winner!

Sorry about not posting this on Thursday.  I was in bed and quite sick for most of the day. 

But finally, here are the layouts from the ladies that completed the challenge:


From Val:


From Errlee:


From Susi:


From Sherri:


I've written all of your names on paper, and my little Khai-man is picking right now....
The winner is ..........

SUSI!!!!

Congrats Susi, you've won any three packages of Thickers from the Shoppe, as well as any 5 sheets of patterned paper!

PM me with your choices and I will order them for you!
And thanks to all of you who participated.

Friday, March 26, 2010

Quotes

When I first started scrapbooking, quotes were very popular. I remember often scouring the web for the perfect quote to include on a layout.

I find that I still like to use quotes on my layouts, but nowadays, they're quotes that come directly from the mouths of my children, instead of someone famous from long ago.

I love scrapbooking for the purpose of memory keeping, but I find it's not only the events that I want to look back on fondly, but also the little moments and the cute things that my kids have said.

Case in point: Last summer, when we were walking around the lake in Denver, my then six year old son, Jonah, kept stopping to point out views for me to take photos of. Each time he did, he called it a "centrepiece." A perfect title for a layout, don't you think?

(I used Bazzill cardstock, Little Yellow Bicycle pp, October Afternoon letter stickers and Basic Grey and Autumn leaves buttons, all from the Shoppe.)

Wednesday, March 24, 2010

weekly challenge 5

This week's challenge...

Use the negative shape. If you're punching or cutting something out, use the negative on your page.


Supplies: paper - Sassafras, Crate. chipboard - Scenic Route. ribbon. tile - KI Memories. Epoxy Sticker - KI Memories. letters - Doodlebug. button - Basic Grey. punch - Marvy Uchida. journaling card - October Afternoon. brad - American Crafts.

Thanks to all you guys playing along!

Tuesday, March 23, 2010

Recipe Stand

I don't know about you, but I used to have the worst system when it came to recipes. I had a whole stack of books and Kraft magazines thrown into a drawer that I rarely looked at because the pile was so intimidating and I never remembered where anything was anyway. My one attempt at organizing resulted in a folder on my desktop, aptly labeled 'Recipes' where, if I remembered, I stored all the recipes we found online. But we rarely referenced the folder when trying to meal plan either.

So, while browsing the internet one day, I came across this recipe stand. Genius! I never did like recipe boxes with cards shoved in. Sounds dumb, but I actually don't like having the recipe card/book sitting on the counter. Because if you're like me, by the time you're finished cooking, the card is splattered and smeared with every ingredient listed. Which makes for great art, but then next time I never know how much pepper to put in because there's a huge blob right over top the number. "Is that 2 Teaspoons? Cups? Litres?!” I loved that all the cards could be on a stand, easy to flip through, up off the counter and out of harm’s way. I haven’t yet, but to further add protection to my collection of recipes passed down from generation to generation....or, ahem, from Kraft magazines and Pioneer Women’s collections, I plan on cutting down a sheet of acrylic that I had leftover from a mini album, punching holes, and slipping that on the front of the stand. That way, I can also take it off and put it in front of the recipe as I cook. I’m all about preservation and prevention baby!


Supplies used:
Maya Road Recipe Stand
pp: Heather Bailey + Hambly
alphas: AC + Cosmo Cricket
stamps: Studio Calico
embellishments: Cosmo Cricket
mist: Maya Road Charcoal
other: Fiskars Threading Water punch

Now I just have to transfer all my recipes onto recipe cards. Yeah, that part of the plan wasn't well thought out.....

Thursday, March 18, 2010

A little tip....

I was working on a layout last night and needed just a little something as an embellishment.

I remembered that I had recently purchased some Prima paper flowers (called "e") in pink and teal blue. The blue on my layout was more periwinkle, so I knew the teal wouldn't work well....

.... when it suddenly occured to me that I could flip the flower over to the plain white side!


Maybe it was just because it was late at night, but this struck me as an ingenious solution and felt I had to share its brillance with you . ;)

Here's the completed layout, which is part of my Congo album.


(I used Bazzill cardstock, Fancy Pants pp, the aforementioned Prima flowers, October Afternoon letter stickers and MOD buttons, all from the Shoppe. The yellow pp is SU!)

Spring.

I have been very excited about spring being here! I love being able to walk the kids to school again (the sidewalks weren't cleared enough to push the stroller during that last part of winter) and I love having the windows open!
However, Environment Canada is predicting winds gusting up to 80 kph, a temperature of -11 and snow all evening, night and most of the day tomorrow. 
There goes walking the kids to school. grr.

However, spring has still been inspiring me.  
And because of that, I have a spring challenge for you. 

Create a layout using the following:
    
yellow, pink or green (only one of the colors need to be on the layout)
a flower or tree
ribbon
staples
and raw chipboard.

The deadline is next Thursday, and I will announce a winner shortly after! Just put a link here in the comments to your layout!

Wednesday, March 17, 2010

weekly challenge 4

This week's challenge, if you're playing along...

Use an animal on your page.


Supplies: paper - ki, cosmo cricket, K&Co. and we r memory keepers, letters - american crafts and doodlebug, flower - basic grey, button - ki, badge - american crafts, clip - making memories. I traced the deer from a Lil' Davis chipboard set (thanks Heather!) and cut it out of paper. It's the closest I could get to a moose! ;)

I can't wait to see what kind of menagerie we'll get from this challenge!

Monday, March 15, 2010

Mid-Month Challenge + A Tutorial

This month's 
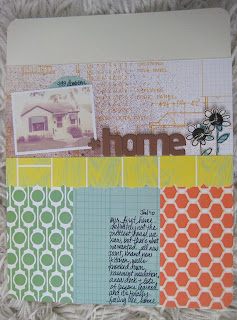
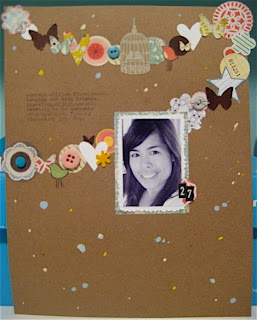
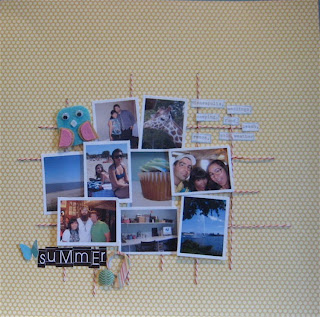
challenge is to use small photos. I only started doing small photos around a year and a half ago and haven't looked back since. I rarely use 4x6 pictures anymore, in fact, when I try, they always look huge to me! Here are some of my layouts using small photos:

One of the reasons I like using them is because I print my pictures at home and I can get more on a sheet this way. I usually make a collage on an 8.5 x 11 sheet of photo paper and print them together. If you've never made a collage before, it's pretty simple. I'll take you through the process in Photoshop Elements 6 for Mac:

Step 1: Open all the pictures you want to print in PSE.

Step 2: Resize each picture to whatever size you want. In my case, I resized them all to 2.25" x 3". To do this, go to Image>Resize>Image Size. Then change your width and height under 'Document Size'. So, my width would be 2.25 inches and height 3 inches.
Step 3: A few things to note - the Resolution and the Constrain Proportions box. You'll want to ensure that all the pictures have the same resolution. I would recommend no smaller than 180. I usually set mine to 180 (if it isn't already defaulted), or 300. I'll come back to why this is important later. You also want to ensure the 'Constrain Proportions' box is checked, otherwise your picture will be all wonky when you resize it.
Step 4: 
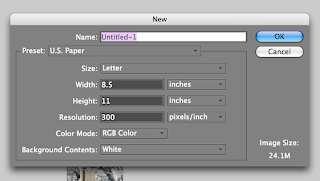
Once you've resized all your photos, open up a new document by going to File>New>Blank File. A box will pop up. Here, you want to set the following:
Preset: U.S. Paper
Size: Letter (if using an 8.5" x 11" sheet of photo paper)
Width: 8.5
Height: 11
Resolution: This must match the resolution you set your pictures to, so either 180 or 300. In my case, it would be 180.

If you accidentally forget to match the resolution of your pictures, you'll end up with pictures that are either way too big, or too small. I've definitely done this a few times and it's super frustrating!!

Step 5: Drag each of your pictures onto the new blank file, by selecting each and literally dragging them onto the canvas. Word of caution - if you've done any post-processing on your pictures, make sure that you flatten the image before dragging or it won't work!

Step 6: Save your image as a .jpeg. You can now upload it to any online photo printing company and print it as a regular 8x10 picture. Or you can print it from home.

Now you're ready to print any sized pictures. I believe you can also make collages in Picasa, but unfortunately I only use PSE for any editing. If anyone wants to share steps for Picasa, feel free!

Friday, March 12, 2010

Instead of being overwhelmed....

... with all of the photos I took on my trip to the Congo and the thought of scrapbooking them all (I took almost 500 and then the four men I travelled with all shared copies of their photos, too), I spent some time on the flights home trying to think of how I could make the album:

1. something I'd enjoy creating (& if it consisted of lots of double page layouts, then I knew I wouldn't enjoy it very much)
2. something that would make the process seem less daunting
3. something different than anything else I'd done in the past.

I kept thinking back to Ali's 365 project and how I liked how she was using the divided page protectors for it. I remembered that Marcy had mentionned getting in some divided page protectors from We R Memory Keepers and I wondered if this is something that I could make work for me.

So here's what I did:

1. I stopped at the Shoppe and purchased two packages of the page protectors. At $7.49 each (for 10 protectors) I figured that it was less than a sheet of cardstock & a regular page protector. I also picked up a package of kraft cardstock.

2. I ordered my pictures online, ordering all of the pictures that I wanted to include to tell my stories. I didn't worry too much if some of the pictures wouldn't get used. I ended up ordering 274 prints (so far... I still want to order a few more yet.)

3. After picking up my prints, I sorted them into event type groups and stories I wanted to tell and placed them in piles in chronological order.


Then, I started putting them into either 12x12 page protectors with a kraft cardstock background, like my first couple of pages here:


Or sliding them into the WRMK sleeves.


The pages above tell different stories and I'll treat them as separate layouts. However, sometimes, I picked a few pictures to "scrapbook" on a kraft background and have a page of photos in sleeves beside it to help tell the story.


Sometimes it was a little tricky to make all the sleeves work with my pictures and making sure that back to back worked chronologically. But I felt a certain amount of freedom to add a story here or there to balance the pages.

So now when I feel like scrapbooking, I can pull out a photo from a kraft cardstock background and scrap it like these two:


Or I can take a page of sleeves and add some cardstock/pp for the title and journaling, like I did here.


And I love that all of my pictures are housed in an album where I can flip through and decide which story I feel like telling and not have to worry about how it will all come together in the end.

Thanks for looking!

Thursday, March 11, 2010

To keep or not to keep. That is the question.

I'm purging.  I've been purging for the last 3 days and it feels great! I've gone through about half of my scrapbooking stuff so far and have donated about 300 sheets of paper and a whole big bag full of embellishments to a friend, plus a bunch of stuff to my son's kindergarten class.

We talk about this lots on the forums - about how often we purge and what do we get rid of when we do?

I've been scrapbooking since 1999-2000, (somewhere in there), so I have collected quite a few things over the past 10+ years.  So, I had to come up with a few guidelines for getting rid of things.  These are fairly basic, but seeing as that's what is going on in my life right now, that's what I'm blogging about today.

1.  If I don't love love love love it - it's gone.
2.  If I haven't used it in 2 years - give it away.
3.  If you've been saving something for a specific purpose (ie. mini book you've been meaning to make, or a layout you've been meaning to do) - give yourself a specific time line to complete the project.  If you've not completed it - give it away, you'll find something else you love if you eventually do the project.
4.  Make sure you've got space for what you have!  If you can't see it or can't find it when you want it because of lack of space, you need to either figure out a new way to store your product or thin it out a bit. 
5. Find someone who can hold you accountable.  Let someone else know what your scrappy space goal is (keeping it neat, making sure everything is put away every night, only keeping and not bying more than you have room for.

So, if you're going through that spring cleaning fever like I am, but don't know where to start, hopefully these guidelines will help you out!

Awesome Sale

If you get our newsletters then you're in luck. If you don't, and you still want to take advantage of our holiday sale, then click here. It's a good one!

Enjoy!
And thank you for your loyalty!

Wednesday, March 10, 2010

Weekly Challenge 3

This week's challenge...

Use something not intended for scrapbooking.


Supplies: paper - Crate, flower - K&Co., sticker - Crate, rub-on - Crate, brad - Basic Grey, flower - American Crafts, ticket stub

You could use ephemera (like a ticket stub) or a book page... anything you didn't purchase in a scrapbooking section or at a scrapbooking store.

As always, leave a link here to your layouts! I love to see what you guys do with the challenges!

Tuesday, March 9, 2010

Only Wednesday?

Wow, is it only Wednesday? I've been having one of those weeks where all you want to do is curl into a ball and put the covers over your head and sleep until it's over. It's been incredibly stressful, to say the least. Yesterday I almost cried and then yelled at the top of my lungs at a coworker. In that order. So, needless to say blogging yesterday wasn't on my radar until about 1 am last night, when I realized that I had forgotten!

Anyway, today's post is short and sweet, I just want to let you know about a little game we're playing on the boards. We're revealing clues about the contents of the April kit little by little. I have to tell you, when I found out what was going to be in the kit I was super excited. I am so ready for winter to be over and the colours in this kit just scream spring. I can't wait to get my hands on it! So, play along with us and if you're brave, post your guesses in the forum! There just might be a little something for those that guess correctly......

Here's the first clue:

Monday, March 8, 2010

We're on holidays...

The online shoppe will be closed Wednesday, March 9th until Wednesday March 31st while we are on holidays. Our physical store will still be opened, but with holiday hours.... weekdays noon-8pm.

Please note: online sign-up for Super Scrap Day will be closed while we gone, but you can still sign up instore.

You can also email me at marcy@myscrapshoppe.com while I'm gone and I'll add you to the list, or you can call the store at 204-325-7342 and they'll write you down.

Friday, March 5, 2010

Online Crop Weekend

What a perfect weekend for an online crop-- no school for the kids, with friends coming over to play, means some scrap time for me!

I've posted a couple of challenges in the forum to get us started. For the challenges, I used the lovely March kit:

#1. Dead centre: Place a photo in the centre of your layout.


2. On the curve: Place your title on your layout in the shape of a curve or circle.


Be sure to check out the the March online crop forum for more challenges. To participate in the crop, simply post your layouts in the MSS gallery and then link your layout back to the challenge it pertains to.

Can't wait to see what you create!

Thursday, March 4, 2010

Inspiration in an unlikely place...

So, I'm back from Vegas and wow, does that city ever have a ton of visual stimulation! For someone who has been in a scrappy slump since before Christmas, it was nice to get away and feel inspired by a world that has NOTHING to do with scrapping. 

So, hopefully I'll be back in the groove and will be able to actually be inspiring.  Stay tuned and we'll see you next week.

New Arrivals and sales

Some more new stuff found it's way onto the shelves today.

First of all, the new kits are out (I'll get the images up tonight or tomorrow)
Also, Imaginesce's new line, Scooter's Vacation. Cute cute papers, stickers and stamps. The stamps are only $1.49... so grab 'em now!
Some Making Memories Flutter papers arrived.
Cute 5x9 chipboard albums from Little Yellow Bicycle are here too.
3L EZ Runners are restocked, and we brought in the Tombow Glue Sticks.

Newly discounted Making Memories 8" Chipboard letters. I found enough letters to spell "Home" and "Family", so I packaged those as a set as well.
All "Love, Elsie" is also discounted 40% (50% for Members).

So, I think that's it for today.
I'm hoping that the Cosmo Cricket lines arrive next week.

Wednesday, March 3, 2010

Weekly Challenge 2

Thanks to everyone who played along last week.


This week's challenge...

Split your journaling into two sections.


The March kit was used to create this layout. Watch for it instore and online tomorrow.

As always, leave a link in the comment section so we can see your work!

Lots more challenges this weekend at our online crop! Enjoy!

Tuesday, March 2, 2010

Inspiration

The gallery has been overflowing lately with tons of awesome layouts, so I wanted to use my post today to highlight some of the stuff that's been catching my eye.


ValLoving this layout by Val. I just love how the colour pops off the page from the flower and that picture is fabulous!

Susi
Susi's posted a ton of great layouts lately, so it was kind of hard to choose, but I kept coming back to this layout. I love the hearts on the side and the handcut title.

Sherri
I believe Sherri made this layout for last week's weekly challenge and I just love that title. So simple and smart and cute!

Jen
I was excited to see a layout by Jen in the gallery because she's taken a bit of a break from the DT to recoup. This layout didn't disappoint with that great banner running across the top and those small photos, which I'm a sucker for!

Errlee
I don't know how she does it, but Errlee's been doing a layout a day (LOAD) for the past few weeks in between juggling work and her family and their crazy schedules! Puts me to shame, that's for sure. Anyway, I loved the subject of this layout and how she documented her birthday. Those pics are fabulous!