i love my scraps!!!
especially when i do paperpiecing and need
that tiny bit of colour..
..and i love having these little projects on
display, so colourful and cute.
so today i am going to show you how i made
the picture above. its pretty easy.
what you'll need is;
-a good variety of scraps
-your favourite embellishments
-a frame or shadowbox (doesn't matter the size..
i used a small shadowbox, but you could use a
frame too!)
- and anything else you love to use!
step 1. I used a dollar store shadow box. remove the sliding
glass panel, and remove the paper inside. I used this paper
as it was the perfect size and used it as my base for my
picture.

step 2. I found in my scraps some paper to create an outdoor
scene. i used the light blue for the sky. You don't have to
cover the entire back with the blue as you'll be adding green.
step 3. add the rolling landscape! i grabbed 3 shades of green
that all kinda of matched..i created a gentle curve on each to
give depth.

step 4. Now comes the fun part! deciding what is going on the
landscape! i love these chip board trees, and haven't used
them, and i love the owl rubons and am always looking at them.
but you can totally use whatever you want..i was gonna use the
house rubon, but it looked too small beside my tree.
step 5. look at your progress, and decide what else you would like
to add..i added the glitter cloud and the hearts.


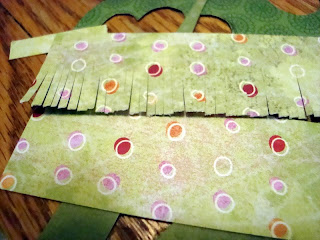
step 6.so in my shadowbox i have some grass right at the front. how i
did that was take a light green and fray it (just small cuts) i left
some extra paper at the bottom and folded it back. the folded piece
becomes the part that goes on the "floor" of my shadow box.

step 7. after i finished my grass, i felt it was missing something
so i added the grey cat and few more sprigs of grass
step 8. add some phrase or word if you like, or just leave it
blank. my words were a last minute detail..

so there you go!!! if you have any questions, i'll be around
the forum!!
later!!
JEn

No comments:
Post a Comment